

Connect Sive.Host to ChatGPT
Connect your Sive.Host account to ChatGPT so you can ask for help with your hosting, domains, websites, email, support requests and eligible servers in a normal conversation.
https://sh.sive.ai/mcpBefore you start
- You need an active eligible Sive.Host shared-hosting or VPS server product. Click to Grab one now.
- Your ChatGPT account or workspace must allow custom apps/plugins and action tools. Availability depends on your ChatGPT plan and workspace settings.
- Use ChatGPT on the web when adding the connection for the first time.
1. Generate your Sive.Host connection credentials
- Sign in to the Sive.Host Client Area.
- Open AI & API Access.
- Generate an API key and secret. Give it a recognisable name such as ChatGPT.
- Copy the secret when it is shown. Store it securely because it may not be displayed again.
2. Add Sive.Host in ChatGPT
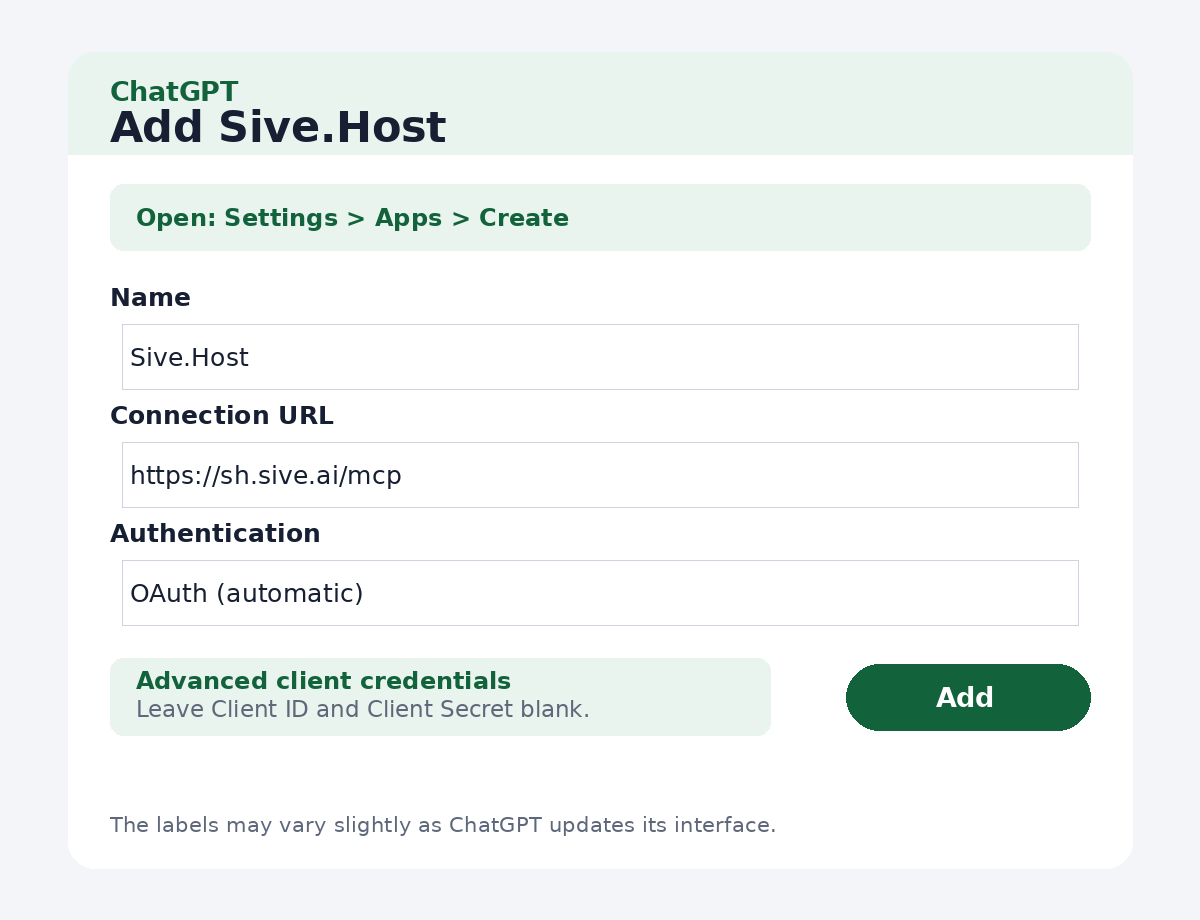
- In ChatGPT, open Settings > Apps. In some interfaces this area may be labelled Plugins.
- If required by your plan or workspace, enable developer access or ask the workspace administrator to allow custom apps.
- Select Create or Add.
- Use Sive.Host as the name.
- Enter
https://sh.sive.ai/mcpas the connection or server URL. - Select OAuth for authentication. Leave advanced Client ID and Client Secret fields empty.
- Choose Scan tools, Check, Create or the equivalent button shown in your interface.
- Review the safety notice and continue only if the URL is exactly
https://sh.sive.ai/mcp. - Icon: https://sive.host/sh.png
3. Authorize your account
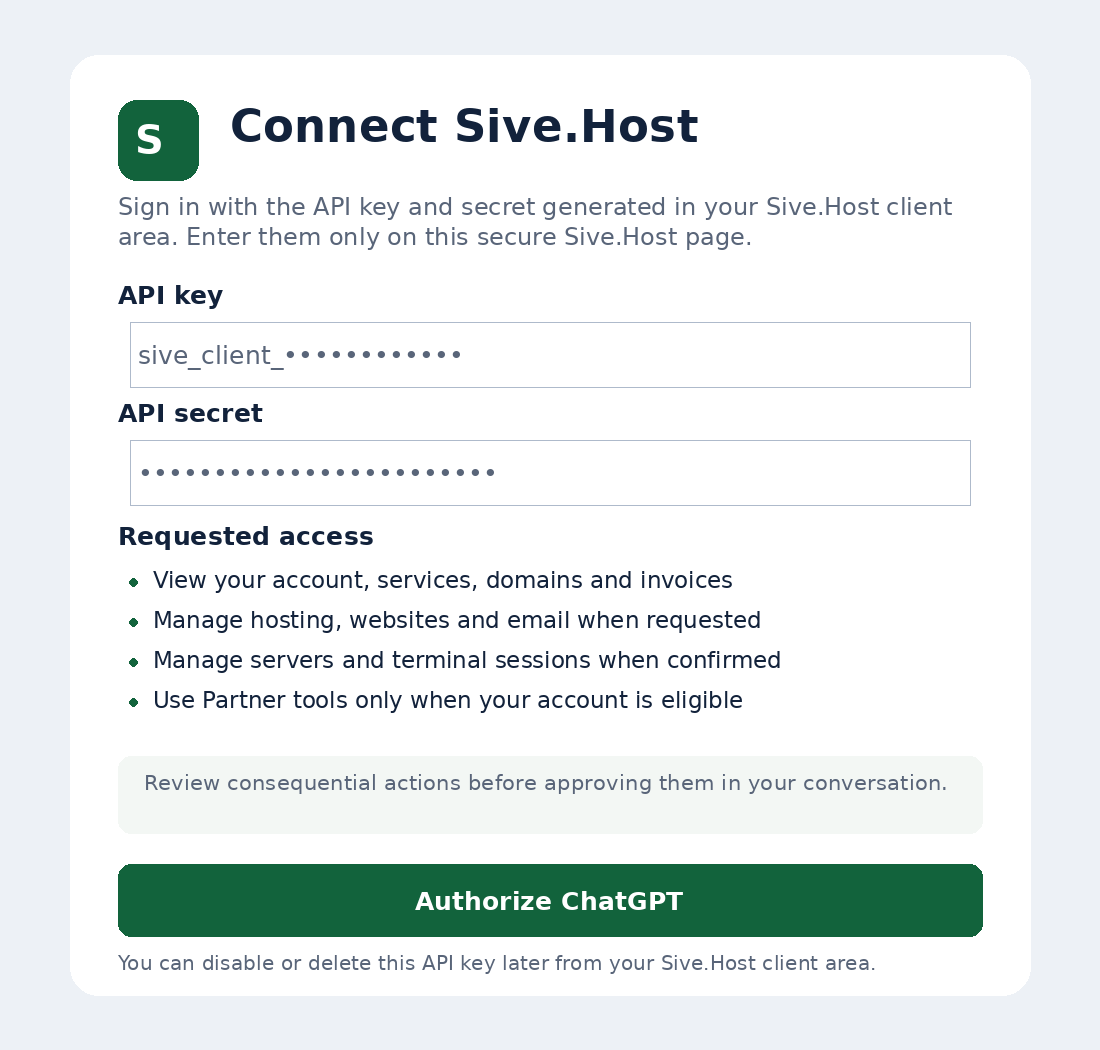
- Select Sign in or Connect.
- ChatGPT opens a secure page on
sh.sive.ai. - Enter the API key and secret generated in your Sive.Host Client Area.
- Review the requested access, then select Authorize ChatGPT.
4. Start using Sive.Host
Start a new conversation, select Sive.Host from the + or More menu, or mention @Sive.Host. Begin with a read-only test:
@Sive.Host, how many active services do I have and what is my current credit balance?
ChatGPT can read only the Sive.Host account authorized by that API key. Important actions such as purchases, deleting files, reinstalling a server, sending email or opening terminal access should require a clear confirmation.
Useful things to ask
Investigate and repair a hacked WordPress website
@Sive.Host, my WordPress website example.com appears to have been hacked. First inspect its recent access and error logs and the relevant website files. Explain the likely entry point and proposed repair. Back up every file before changing it, ask me before consequential changes, then verify the homepage and WordPress login and harden the same entry point against a repeat attack.
Sive.Host can securely retrieve bounded logs belonging to your domain even though the underlying server log files are outside your website directory. It can then use the website tools available to your owned hosting account. A severe account-wide or server-wide compromise may still need escalation to Sive.Host support.
Publish or repair a website
@Sive.Host, publish this finished website to example.com. Back up the existing files first and verify the public HTTPS page before saying it is live.
Work with email
@Sive.Host, show me the latest unread messages for accounts@example.com. Draft replies, but show me each From, To, subject and body before sending.
Manage a server
@Sive.Host, check the health of my newest server and explain any storage, memory or CPU problem. Do not make changes until I approve them.
Domains, billing and support
@Sive.Host, check whether example.co.za is available and show me the registration price. Do not purchase it yet.
@Sive.Host, show my latest support ticket and tell me whether Sive.Host has replied.
Troubleshooting
- The authorization request expired: close that page and restart the connection from ChatGPT. Do not reuse an old authorization link.
- Connection expired: open ChatGPT Settings > Apps, select Sive.Host and reconnect.
- A new action is missing: use the Sive.Host app's Refresh option so ChatGPT scans the current actions.
- Additional permission required: reconnect Sive.Host and approve the requested access.
- Wrong account: disconnect Sive.Host, then reconnect with the API key belonging to the intended Sive.Host account.
Disconnect or revoke access
You can disconnect Sive.Host from ChatGPT in ChatGPT Settings. You can also disable or delete the API key under AI & API Access; this immediately prevents that key from being used again.
Interface labels can change as ChatGPT is updated. The connection address and Sive.Host authorization process remain the same.

