
KVM (Kernel-based Virtual Machine) is a virtualization infrastructure for the Linux which requires a processor with hardware virtualization extension to be able to host guest sytems. KVM is convenient solution to test and try different operating systems if you don’t have a possibility to purchase expensive and power consuming physical hardware.
The below tutorial presents KVM (QEMU) installation and setup along with Linux Bridge configuration on CentOS7 / RedHat7 operating system.
Steps:
1. Verify CPU Hardware Virtualization support
Our CPU must support hardware virtualization (VT-x) in order to become KVM Hypervisor and host Virtual Machines (guest operating systems):
[root@SiveHost ~]# lscpu
Architecture:          x86_64
CPU op-mode(s):        32-bit, 64-bit
Byte Order:            Little Endian
CPU(s):                4
On-line CPU(s) list:   0-3
Thread(s) per core:    2
Core(s) per socket:    2
Socket(s):             1
NUMA node(s):          1
Vendor ID:             GenuineIntel
CPU family:            6
Model:                 42
Model name:            Intel(R) Core(TM) i5-2520M CPU @ 2.50GHz
Stepping:              7
CPU MHz:               800.000
BogoMIPS:              4988.58
Virtualization:        VT-x
L1d cache:             32K
L1i cache:             32K
L2 cache:              256K
L3 cache:              3072K
NUMA node0 CPU(s):     0-3
2. Disable and stop NetworkManager
NetworkManager is known to cause problems when working with Linux Bridge, so for us it’s better to disable it:
[root@SiveHost ~]# systemctl stop NetworkManager
[root@SiveHost ~]# systemctl disable NetworkManager
Removed symlink /etc/systemd/system/multi-user.target.wants/NetworkManager.service.
Removed symlink /etc/systemd/system/dbus-org.freedesktop.NetworkManager.service.
Removed symlink /etc/systemd/system/dbus-org.freedesktop.nm-dispatcher.service.
3. Install KVM related packages
[root@SiveHost ~]# yum install qemu-kvm qemu-img libvirt libvirt-python libvirt-client virt-install virt-viewer virt-manager4. Launch and enable libvirtd daemon
[root@SiveHost ~]# systemctl enable libvirtd
[root@SiveHost ~]# systemctl start libvirtd
5. Set system-wide privileges for KVM
We need to add our regular user USERNAME to kvm group to let him launch virt-manager
[root@SiveHost ~]# usermod -a -G kvm USERNAMEWe also need to set polkit (policy kit) rules for KVM.
Edit file 49-polkit-pkla-compat.rules:
[root@SiveHost ~]# vim /etc/polkit-1/rules.d/49-polkit-pkla-compat.rulesand add the following ath the bottom:
polkit.addRule(function(action, subject) {
    if (action.id == "org.libvirt.unix.manage" &&
        subject.isInGroup("kvm")) {
            return polkit.Result.YES;
        }
});
6. Create KVM Linux Bridge (bridge KVM hypervisor host network interface with VM network interfaces)
In this tutorial we want Virtual Machines to obtain their IP addresses from the same network where KVM Hypervisor host is connected, that’s why we will bridge it’s main network interface (em1) with VM network interfaces. To do so, we need to create Linux Bridge from em1 interface on KVM Hypervisor host.
Current Hypervisor network configuration (right after KVM installation):
[root@SiveHost ~]# ip a
1: lo:  mtu 65536 qdisc noqueue state UNKNOWN
    link/loopback 00:00:00:00:00:00 brd 00:00:00:00:00:00
    inet 127.0.0.1/8 scope host lo
       valid_lft forever preferred_lft forever
    inet6 ::1/128 scope host
       valid_lft forever preferred_lft forever
2: em1:  mtu 1500 qdisc pfifo_fast state UP qlen 1000
    link/ether d0:67:e5:33:15:3f brd ff:ff:ff:ff:ff:ff
    inet 192.168.2.3/24 brd 192.168.2.255 scope global dynamic em1
       valid_lft 73193sec preferred_lft 73193sec
    inet6 fe80::d267:e5ff:fe33:153f/64 scope link
       valid_lft forever preferred_lft forever
3: wlp3s0:  mtu 1500 qdisc noop state DOWN qlen 1000
    link/ether 00:24:d7:f4:dc:e8 brd ff:ff:ff:ff:ff:ff
4: virbr0:  mtu 1500 qdisc noqueue state DOWN
    link/ether 52:54:00:b7:22:b3 brd ff:ff:ff:ff:ff:ff
    inet 192.168.122.1/24 brd 192.168.122.255 scope global virbr0
       valid_lft forever preferred_lft forever
5: virbr0-nic:  mtu 1500 qdisc pfifo_fast master virbr0 state DOWN qlen 500
    link/ether 52:54:00:b7:22:b3 brd ff:ff:ff:ff:ff:ff
ifcfg-em1 config file (before KVM Linux Bridge creation):
[root@SiveHost ~]# cat /etc/sysconfig/network-scripts/ifcfg-em1
DEVICE="em1"
TYPE="Ethernet"
BOOTPROTO="none"
NAME="em1"
ONBOOT="yes"
HWADDR="D0:67:E5:33:15:3F"
IPADDR=192.168.2.3
PREFIX=24
GATEWAY=192.168.2.1
PEERDNS="no"
NM_CONTROLLED="no"
For KVM networking configuration we will use virt-manager application which is a user-friendly GUI frontend for KVM command line interface.
Note: virbr0 interface was created automatically along with KVM installation and represents virtual network existing “inside” KVM environment with NAT (Network Address Translation) enabled.
Since we don’t need NAT inside KVM environment (we want to bridge Hypervisor interface), we can remove existing KVM virtual network based on virbr0 interface.
Launch virt-manager as root:
[root@SiveHost ~]# virt-manager…virt-manager window should appear:

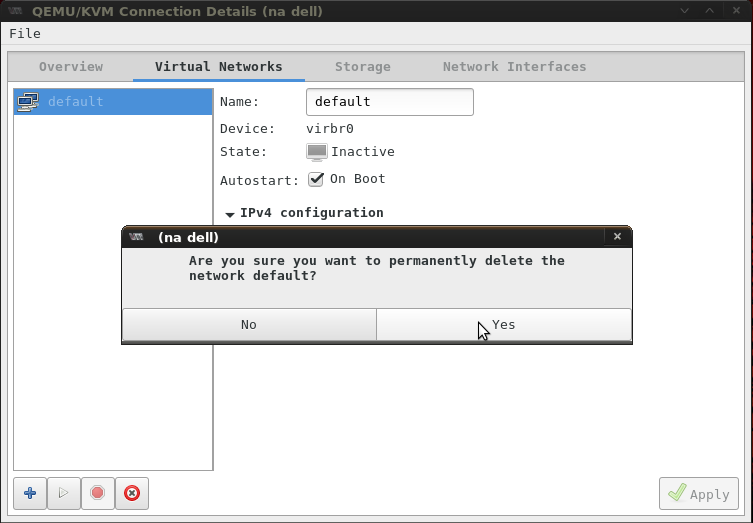
Right click: QEMU/KVM -> Details -> Virtual Networks -> Disable network: “default” -> Delete network: “default” based on virbr0
Now we can bridge KVM Hypervisor interface (em1):
Right click: QEMU/KVM -> Details -> Network Interfaces -> Add Interface:
Interface type: Bridge
Interface name: br-em1
Start mode: on boot
Activate now: enabled
IP settings: copy configuration from ’em1′
Bridge settings: STP on, delay 0.00 sec
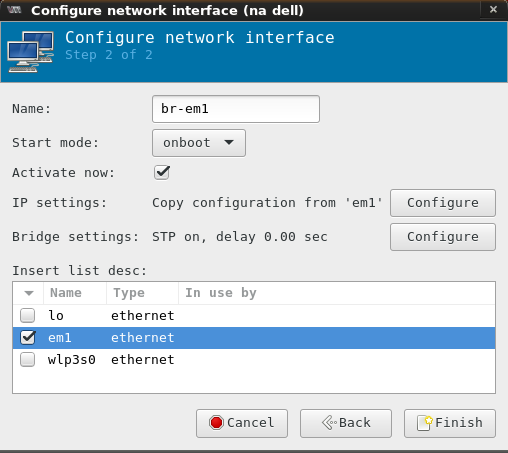
… press Finish to override the existing configuration and create KVM Linux Bridge.
Now we can verify newly created Linux Bridge (br-em1):
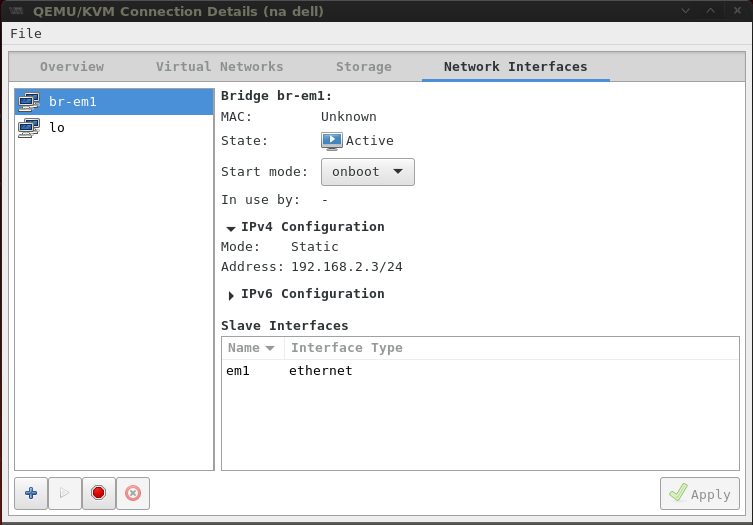
Check current IP configuration (IP is now assigned to br-em1 and em1 acts now as backend interface only):
[root@SiveHost ~]# ip a
1: lo:  mtu 65536 qdisc noqueue state UNKNOWN
    link/loopback 00:00:00:00:00:00 brd 00:00:00:00:00:00
    inet 127.0.0.1/8 scope host lo
       valid_lft forever preferred_lft forever
    inet6 ::1/128 scope host
       valid_lft forever preferred_lft forever
2: em1:  mtu 1500 qdisc pfifo_fast master br-em1 state UP qlen 1000
    link/ether d0:67:e5:33:15:3f brd ff:ff:ff:ff:ff:ff
3: wlp3s0:  mtu 1500 qdisc noop state DOWN qlen 1000
    link/ether 00:24:d7:f4:dc:e8 brd ff:ff:ff:ff:ff:ff
6: br-em1:  mtu 1500 qdisc noqueue state UP
    link/ether d0:67:e5:33:15:3f brd ff:ff:ff:ff:ff:ff
    inet 192.168.2.3/24 brd 192.168.2.255 scope global br-em1
       valid_lft forever preferred_lft forever
    inet6 fe80::d267:e5ff:fe33:153f/64 scope link
       valid_lft forever preferred_lft forever
Verify Linux Bridge configuration:
[root@SiveHost ~]# brctl show
bridge name	bridge id		   STP enabled interfaces
br-em1		8000.d067e533153f  yes		   em1
KVM Linux Bridge is now configured.
7. Further steps – launching VMs
You can proceed now with Virtual Machines installation, you can also launch VMs from already created qcow2 images of VMs, if you have those.
If you need Kali Linux qcow2 images. Images marked as non-ci have root password configured and are suitable for KVM.
